

Since WordPress comes preinstalled on all our WordPress plans, all you need to do is complete setup by going to yourdomain.com/wp-admin in your browser and following the onscreen prompts to choose your settings.
After that, you have a website!
 So what’s next? This blog post gives you a list of quick tasks you can do to make sure your website is configured properly. If you get stuck or need more of an explanation, just raise a ticket with our support team and they’ll be happy to help! While these tasks are a good starting point, there’s no replacement for you familiarizing yourself with your WordPress Dashboard and spending some time looking through all the different options and settings.
If you’re already familiar with WordPress, download our PDF checklist of WordPress tasks here for your new projects or client sites. If you’re not, we’d recommend reading the post below first before you grab the checklist.
You can do these tasks in any order, and you may want to skip some if they aren’t relevant to you, your theme, or your website. Enjoy!
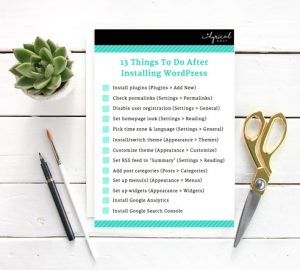
01. Install important plugins
02. Check your permalink settings
03. Disable user registration
04. [Optional] Configure your homepage
05. Change language, date & time zone
06. Install a new theme/change themes
07. Customize your theme
08. Set your RSS feed to ‘Summary’
09. Add post categories
10. Set up your menu
11. Set up your widgets
12. [Optional] Install Google Analytics
13. Install Google Search Console
Task 01. Install important plugins
Estimated time to complete: 30 mins
WordPress has thousands of plugins to choose from, but to start with you just need a few: one to stop your site being public until you’re ready to launch it (such as SeedProd’s Maintenance Mode), WordFence (which is great for extra security), and a spam plugin like Akismet.
Depending on the maintenance mode plugin you choose, you may need to turn it on to hide your site. To check if your site is visible to the outside world, log out and visit your URL, or open another browser or Incognito tab. Your site will display the current WordPress theme if it’s publicly viewable and a short maintenance message if not.
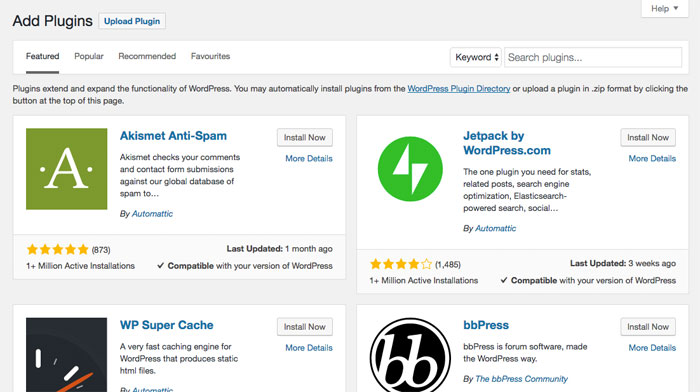
To install these plugins and many more, log in to your WordPress Dashboard at yoursite.com/wp-admin, and choose Plugins > Add New in the menu. From here you can use the search bar to look for ‘Akismet’ and other plugins, and hit install.
Check out our list of 7 Free Essential WordPress plugins to get started.
Tip: Under Settings > Reading, there’s a checkbox that will stop search engines finding your website before you’ve launched. We strongly recommend not checking this box, because it stops people finding any prelaunch info you have on your site, plus it takes a while for the search engines to find your website after you untick it for launch.
Task 02. Check your permalink settings
Estimated time to complete: Less than a minute
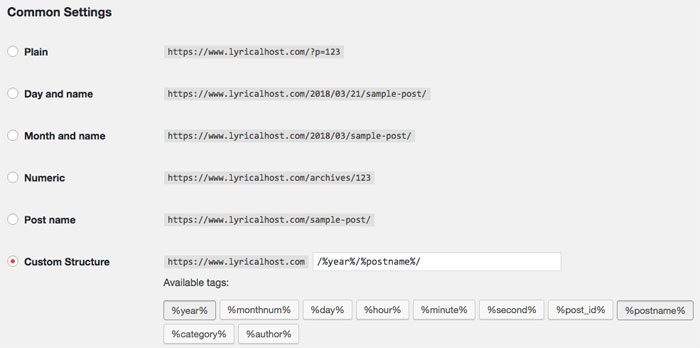
“Permalinks” are the way your website URLs are structured. For example, when you publish a post, the URL to visit it could be:
yoursite.com/?p=123 (doesn’t tell you anything about what the post is about)
yoursite.com/2018/03/21/your-post-title (includes the date, likely to be very long)
yoursite.com/your-post-title (tells you everything you need to know, not too long)
…or something else.
To choose how your post URLs are generated, go to Settings > Permalinks. From there you can choose how you want your URLs to look.
If you’re not sure what to go with, we’d recommend choosing Post Name. That way your URLs are easy for visitors and search engines to understand, but they aren’t too long.
Task 03. Disable user registration
Estimated time to complete: Less than a minute
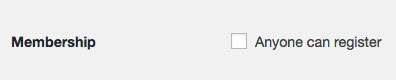
By default, users can register as Subscribers on your website. This is different to email subscribers; these Subscribers have a limited login which can be used for things like commenting on your site. Since your comment form can be filled out by anyone without needing a user account, we recommend you turn off the user registration option because it’s widely abused by bots and can impact your site security.
To do this, go to Settings > General and make sure the box next to ‘Anyone can register’ is unchecked.
Task 04. [Optional] Configure your homepage
Estimated time to complete: Less than a minute
WordPress can display a page of your choice or your latest blog posts on your homepage. To set your preferences, go to Settings > Reading, where you can choose between ‘Static Page’ or ‘Latest Posts’. In this image, you can see we have a page set for our homepage rather than our blog posts, but it’s just a matter of your own personal preference.

To set a page, you will have already needed to create and publish the page (under Pages > Add New).
Tip:If you are setting your latest posts as your homepage default, we strongly recommend setting it to no more than five posts so your website loads quickly. To prevent the entirety of a post showing on your homepage, use the ‘more’ tag or the excerpt snippet in each post to create a break point. Not only does this make your website load faster, it helps reduce your bounce rate.
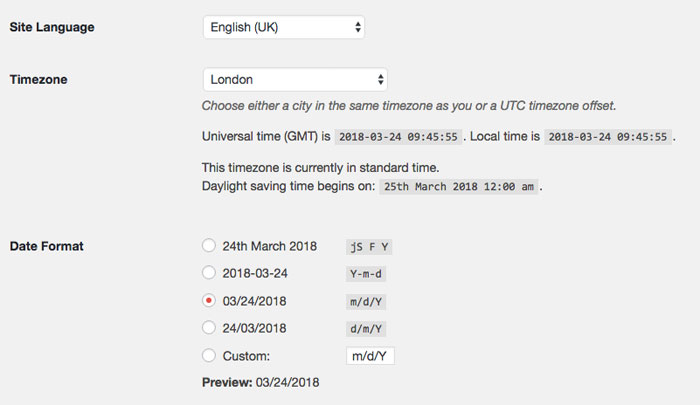
Task 05. Change language, date & time zone
Estimated time to complete: Less than a minute
By default, WordPress is set to English, but you can choose a different region (e.g. US or GB), or switch to another language if you prefer. You can also select your time zone.
We’d recommend switching to a numerical date form such as 03/23/18. This is because search engines and other third parties can pick up recurring words such as ‘January’, ‘February’ etc. on every post on your site, so it avoids any keyword frequency confusion.
To change all the above, go to Settings > General and select your preferred options, then hit save.
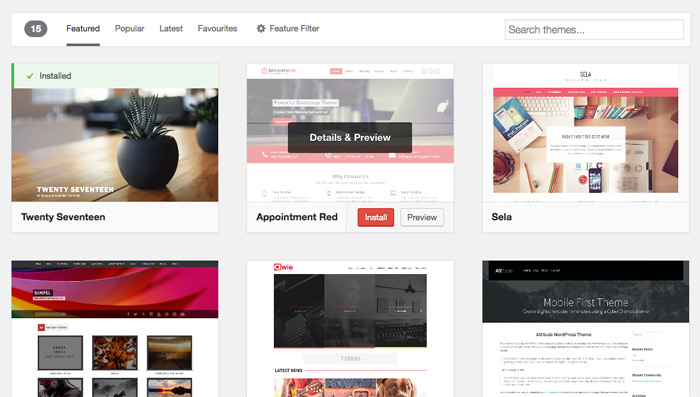
Task 06. Install a new theme/switch themes
Estimated time to complete: Varies
The WordPress Theme Directory has thousands of free themes you can install straight from your Dashboard. To do this, go to Appearance > Themes and click the ‘Add New’ button at the top of your screen. From here you can use the search box on the right to look for themes (for example ‘pink’ or ‘minimal’, or by a name if you know one).
When you hover over any of the previews, you’ll see the available options. The ‘Install’ button will make the theme available for your website, and ‘Activate’ means the theme has already been installed and can be activated across your site.
To switch between themes, simply click hover over the installed theme and click ‘Activate’.
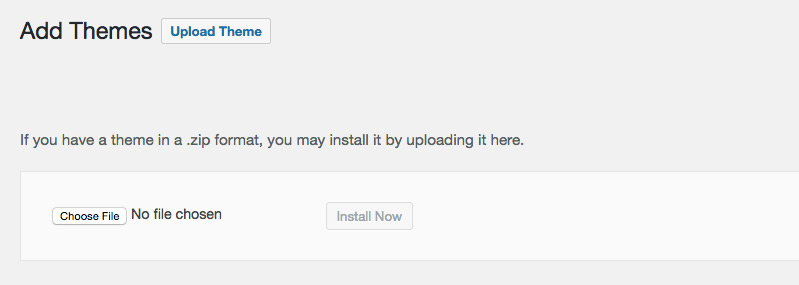
If you want to install a paid theme that you’ve bought elsewhere, click ‘Upload Theme’ at the top of the ‘Add Theme’ screen and you’ll have the option to upload a zipped folder.
Prefer a video tutorial for this bit? Check out the ‘Themes & Plugins’ section of our WordPress Video Tutorials page.
Task 07. Customize your theme
Estimated time to complete: Varies
If you go to Appearance > Customize, you’ll find some easy to use tools for customizing your website. From here you have lots of options, for example under ‘Site Identity’ you can set a title, tagline, and a favicon for your website.
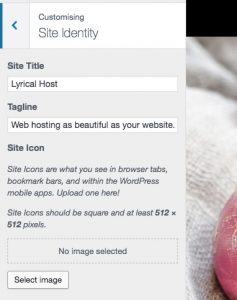
Depending on which theme you selected, you may find other options for theme customization in your Dashboard sidebar or settings. If you’re comfortable with code, you can also go to Appearance > Editor to edit your currently active theme.
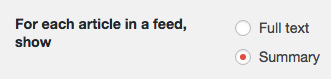
Task 08. Set your RSS feed to ‘Summary’
Estimated time to complete: Less than a minute
By default, your RSS feed will show your blog posts in full. This means that any service using RSS, (for example Blog Lovin’, feed readers such as Feedly, automatic emails that tell your readers about new posts), will display your entire blog post.
You don’t want that to happen, for two reasons: 1) It makes your content a lot easier to steal; 2) People won’t bother to click through to your website if they can read your entire post in an email or their RSS reader.
Happily, it’s just a quick change so that RSS readers only show the beginning of your posts instead of the whole thing (along with a link to read the rest of your post).
Simply go to Settings > Reading, and choose the ‘Summary’ option, then hit the ‘Save Changes’ button.
Task 09. Add post categories
Estimated time to complete: 5 minutes
Categories are the best way to organize your posts so your visitors (and you!) can find them easily. Categories may also be used in plugins; for example a lot of related posts plugins use Categories to determine if posts are similar.
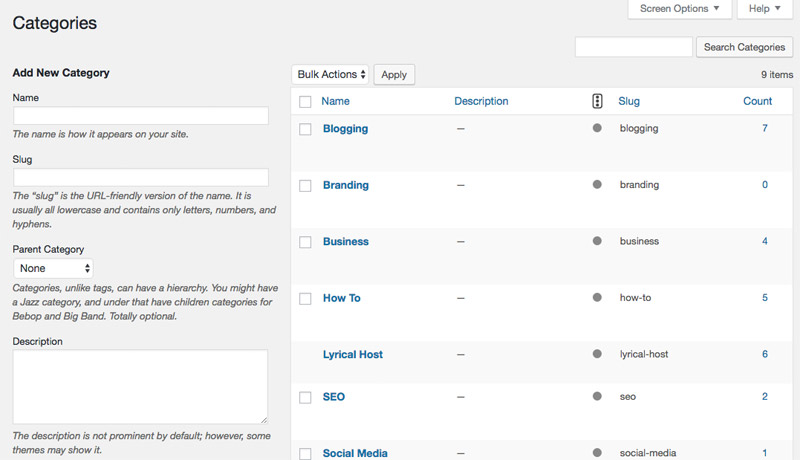
Setting up categories is really simple. From your WordPress Dashboard, click ‘Categories’ in the sidebar to view existing categories and set up new ones by adding a name and description. The way categories display on your website will depend on your theme. Categories won’t exist or display on your website unless they have at least one post in them, so if you create a new category but can’t see it, that’s usually why!
We have a video on Categories if you prefer a complete walkthrough. Simply head to our WordPress Video Tutorials page, scroll down to the ‘Posts & Pages’ section and find the ‘Categories’ video.
Task 10. Set up your menu
Estimated time to complete: Varies
Once you’ve created your pages, you can add them to a menu. Menus work on a tree system, so you can create many levels of pages (depending on your theme). You can also create multiple menus to mix and match them across your site (again, this functionality will depend on your theme), or so you can swap menus in and out easily.
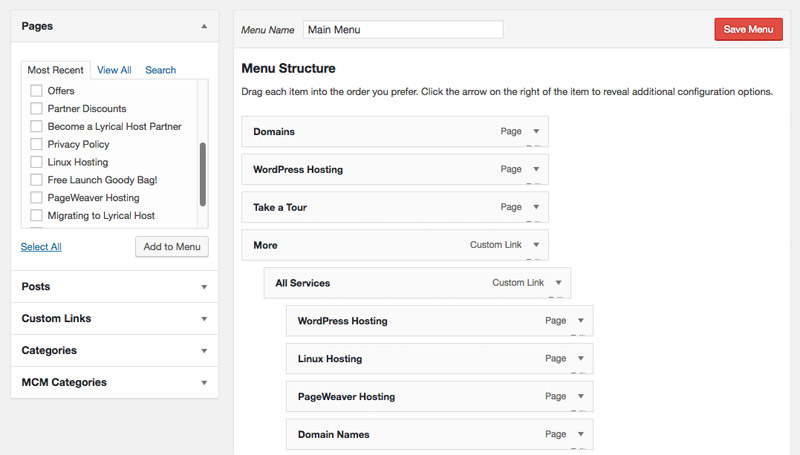
Go to Appearance > Menus, name your menu and then simply click the checkboxes to add selected pages to your menu. once added, you can drag and drop them around to form the order and nesting levels you want. For more details and a visual walkthrough, check out our ‘Menus’ video under the ‘Themes & Plugins’ section of our video tutorials.
Task 11. Set up your widgets
Estimated time to complete: Varies
Widgets are a quick way to drag and drop additional site-wide functionality and content to your WordPress site. For example, you could use a social media widget to add Twitter and Facebook icons that link to your profiles in your sidebar.
You can create your own widgets; many themes also come with custom widgets you can drag, drop, and edit. Widgets most typically show in sidebars, but may also appear in your header and footer so it’s best to check what you have available in your theme from the Widgets screen.
To access it, go to Appearance > Widgets in your WordPress Dashboard. Underneath ‘Available Widgets’, you can click the different options to see what they include. Once you’ve found a widget you want to use, simply click and drag it over to the appropriate column on the right. From there you can drag and drop to put them in the order you want them to display.
Take a look at our WordPress Video Tutorials page, scrolling down to ‘Themes & Plugins’ section and choosing the ‘Widgets’ video for a visual guide.
Task 12. [Optional] Install Google Analytics
Google Analytics tracks all your website visitor data, including how many people visited your website, how many pages they viewed, how long they spent browsing, and so on. If you’re already using a different analytics tool, such as JetPack, you don’t need to install Google Analytics. You can also check out website stats straight from your hosting control panel if you’re a Lyrical Host customer (just scroll to the bottom and click the stats icon).
However, Google Analytics is a lot more powerful and more accurate in terms of stats, so it’s no bad thing to have it running. Follow this tutorial for installing Google Analytics without a plugin.
Task 13. Install Google Search Console
Google Search Console is a separate dashboard for your website. When you set it up, you’ll be able to see things like how many pages of your site have been indexed by Google, whether there are any 404 page not found errors, whether you have any recorded Google penalties, what keywords you rank for, and a ton of other useful information.
To set up Google Search Console, take a look at this tutorial (you’ll need to install the Yoast SEO plugin beforehand, as per task one on this page). Once you’ve done this and put your site live, you’ll want to submit your sitemap to Google to tell them about your website.
If you get stuck along the way and you’re a Lyrical Host customer, please tell us and we’ll get that sorted for you.
Aaaand…you’re done!
The TL;DR
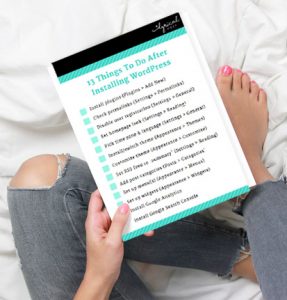
If you’d prefer to work from a checklist that you can download (and even print if needed), click here to download the short version of this blog post in list form.
If you’re a Lyrical Host customer, you can learn more about using and working with WordPress in our free download, The Ultimate Guide to Getting Started with WordPress, which is available free from the Resource Library. We also have a bunch of short WordPress video tutorials you may find useful.
Found this post useful or know someone who would? Pin it for later:


Pingback: SEO For Bloggers: A Beginner's Guide - Lyrical Host
Pingback: The Blogger's Guide To Bounce Rate - Lyrical Host